
Everyone wants to extend freshness and reduce waste, so lets explore some essential food tips.
There is real money sitting in most people’s kitchens right now, quietly going bad. A forgotten half-onion going soft in the fridge. Flour that has gone rancid in a cabinet too close to the stove. Leftovers pushed to the back of a shelf nobody checks. A freezer full of unidentified bags that have been there since last spring.
None of this happens because people don’t care. It happens because nobody taught us the small, specific habits that make food storage actually work. Our grandmothers knew these things without thinking twice. Somewhere along the way, that practical knowledge got lost.
Let’s bring it back, sweet one. This is a room-by-room, food-by-food guide to storing what you have with the respect it deserves.
Your Pantry Is Not Just a Shelf, It’s a System with Essential Food tips
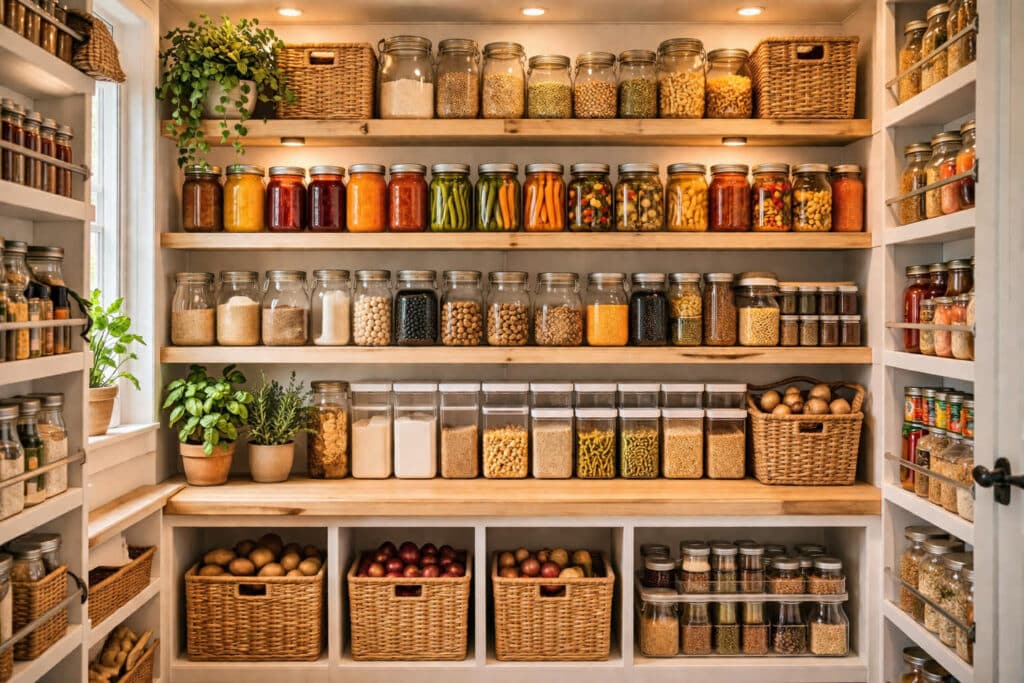
A well-kept pantry is one of the quiet superpowers of a homesteader’s kitchen. But most pantries work against us because the things that spoil fastest are buried behind the things we bought most recently. Before we talk about what to store where, let’s talk about the habit that changes everything: first in, first out.
When you bring groceries home, put the new items behind the old ones. Every time. It sounds simple because it is, but this one practice will reduce your pantry waste more than any organizer bin or label system you could buy.
Dry Goods: What They Need and What Kills Them
Flour, cornmeal, oats, rice, dried beans, and other dry staples all share three enemies: heat, moisture, and air. Storing them in airtight containers rather than the original paper or thin plastic bags they come in extends their life dramatically. Glass jars, thick plastic canisters, or sealed food-grade buckets all work well.
The other thing that shortens dry goods is location. A cabinet directly above or beside the stove is a hot, humid environment that causes oils in whole grains and flours to go rancid faster. Move your flour and cornmeal to a cooler cabinet, a lower shelf, or even the refrigerator or freezer if you don’t use them quickly.
Whole wheat flour and nut-based flours — almond flour, coconut flour — are especially prone to rancidity because of their fat content. If you bake with them occasionally rather than every week, the freezer is genuinely the best home for them.
Onions, Garlic, and Potatoes
These three store well together in spirit but should not be stored together in practice. Onions and potatoes each release gases that accelerate spoilage in the other. Keep them in separate baskets or bins, in a cool dark spot with good airflow.
Garlic heads keep for several weeks at room temperature in a dry, ventilated spot. Once a head is broken and individual cloves are separated, use them within ten days to two weeks. Peeled garlic cloves submerged in olive oil can be refrigerated for up to two weeks — and the garlic-infused oil is wonderful for cooking.
Potatoes need darkness most of all. Light triggers them to turn green and develop solanine, which is mildly toxic and very bitter. A paper bag or a cloth sack in a dark cabinet works beautifully and costs nothing.
Oils, Vinegars, and Condiments
Cooking oils are vulnerable to light and heat, which cause oxidation and rancidity. Olive oil, in particular, should never live next to the stove or in a glass bottle on a sunny windowsill, no matter how pretty it looks. Store oils in a cool, dark cabinet and buy in sizes you will use within two to three months once opened.
Honey is the one pantry item that essentially never spoils if kept sealed and dry. Crystallized honey is not ruined — just set the jar in warm water for a few minutes and it will return to liquid. Vinegars are similarly long-lived when sealed. Both are pantry workhorses that earn their permanent spot.
The Refrigerator Has Zones, and They Matter
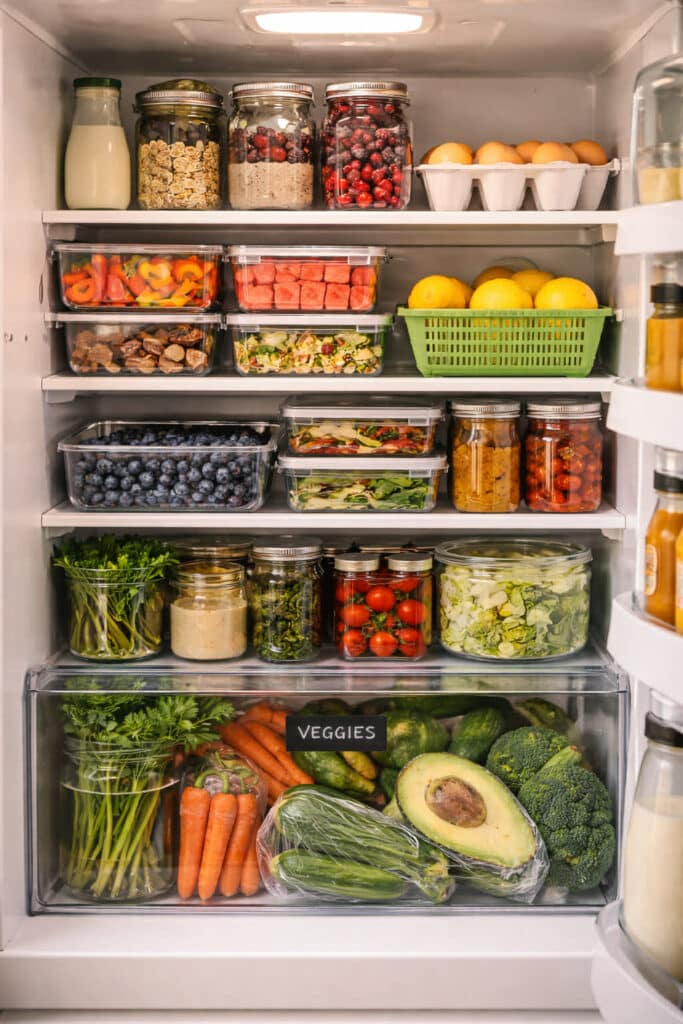
Most of us treat the refrigerator like one big cold box and put things wherever they fit. But different shelves and sections maintain different temperatures, and putting food in the right zone genuinely extends how long it stays fresh.
| Zone | Temperature | Best For | Avoid Here |
| Upper shelves | Warmest shelf area | Leftovers, drinks, ready-to-eat foods, eggs | Raw meat or highly perishable items |
| Lower shelves | Coldest shelf area | Raw meat, poultry, fish (always on a tray) | Delicate produce sensitive to extreme cold |
| Door shelves | Warmest spot in fridge | Condiments, juice, butter, hard cheeses | Eggs, milk, or anything highly perishable |
| Crisper (high humidity) | Cool and moist | Leafy greens, herbs, broccoli, snap peas, cucumbers | Ethylene-producing fruits |
| Crisper (low humidity) | Cool and dry | Apples, pears, grapes, stone fruits once ripe | Delicate greens and moisture-sensitive vegetables |
The Paper Towel Method for Greens
Line your container or storage bag with a dry paper towel before adding washed greens, and lay another on top before sealing. The towel absorbs excess moisture — which is the primary cause of leafy greens going slimy in the fridge. This single habit can double or triple how long your lettuce, spinach, kale, and herbs stay crisp and bright. It works every time.
Cheese, Dairy, and Eggs
Hard cheeses keep longest when wrapped in wax paper or parchment rather than plastic wrap. Plastic traps moisture and encourages mold at the surface. After wrapping in paper, you can place the cheese in a loose zip bag for extra protection. Soft cheeses and fresh cheeses should stay in their original containers and be used within a week of opening.
Milk and cream belong on a middle or lower shelf, not the door despite what refrigerator designers seem to believe. The door is the warmest spot in the refrigerator and milk kept there will sour faster. Eggs do the same. Move them inward and you will notice the difference.
Leftovers Deserve a System Too
Leftovers that get eaten are the ones you can see. If they go into an opaque container on a back shelf, they will be forgotten every time. Store leftovers in clear containers on the upper shelf at eye level, and make a habit of checking them before you plan any new meal.
In our house the rule is simple: if it went into the fridge on Sunday, it needs to be eaten by Wednesday — or moved to the freezer before Wednesday arrives. Label with the date if you tend to lose track. A roll of masking tape and a marker costs almost nothing and takes two seconds. It is one of the most useful habits in a homestead kitchen.
“The way a kitchen is kept tells you something about the way a home is loved. Storing food with care is not fussiness. It is faithfulness to what you have been given.”
— AuntC♥ the Backyard Homesteader
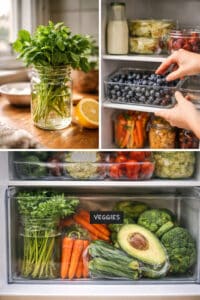
Produce Has Rules, and Most of Us Never Learned The Essential Food Tips
Some fruits and vegetables want the cold. Some are actually harmed by it. Knowing the difference is one of the foundational skills of a low-waste kitchen, and it is not complicated once someone lays it out clearly for you
| Produce | Where to Store | How Long | Key Tip |
| Tomatoes | Counter, stem-side down | 5–7 days | Refrigerating kills flavor and creates mealy texture |
| Leafy greens | Fridge with paper towel | 5–10 days | Wash just before using, not before storing |
| Fresh herbs | Fridge, stems in water | 1–3 weeks | Treat like flowers — snip stems, cover loosely with a bag |
| Berries | Fridge, unwashed | 5–7 days | Wash only right before eating; moisture causes mold |
| Citrus | Counter up to 1 week, then fridge | 3–4 weeks in fridge | Zest before refrigerating; freeze the zest |
| Avocados | Counter until ripe, then fridge | 2–5 days once ripe | Rub cut surface with lemon juice to slow browning |
| Snap peas | Fridge in a dry bag | 5–7 days | Keep pods dry; trapped moisture shortens life |
| Cucumbers | Counter or fridge door | 4–5 days | Sensitive to cold — keep toward the warmer door shelf |
| Bananas | Counter until ripe | 3–5 days | Separate from the bunch to slow ripening |
| Apples | Fridge, away from greens | 4–6 weeks | High ethylene producers — store separately from vegetables |
| Carrots and celery | Fridge in a jar of water | 2–4 weeks | Submerging in water keeps them crisp much longer |
The Freezer Is Not a Graveyard — It’s a Pantry
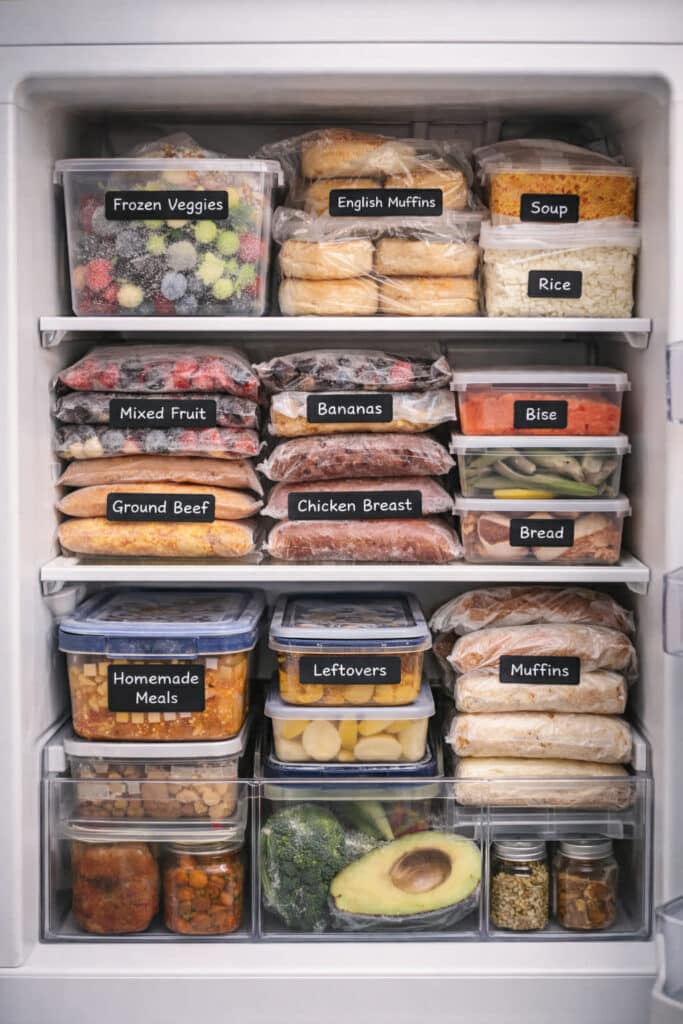
Too many freezers are where food goes to be forgotten. Unlabeled bags of mystery meat. Fruit from two summers ago. Leftovers put in “just until we get to them” and never retrieved. I understand how it happens. But a well-managed freezer is one of the most valuable tools in a homestead kitchen, and it is worth treating it like one.
The Three Rules of a Working Freezer
Label everything with the contents and the date, without exception. A piece of masking tape and a marker takes three seconds and saves the frozen meal from becoming a mystery six months from now. Freeze flat whenever possible — soups, stews, beans, and grains frozen in zip bags laid flat stack like file folders and take up a fraction of the space of round containers. And keep a simple list on the freezer door of what is inside. Even a handwritten sticky note updated when things go in or come out changes your relationship with the freezer entirely.
What to Freeze Before It’s Lost
- Berries — freeze on a sheet pan first so they don’t clump, then transfer to a bag
- Bananas past their prime — peel, slice, and freeze for smoothies or banana bread
- Citrus zest and juice — both freeze for three months or more; use an ice cube tray for juice
- Fresh herbs in olive oil — chop and press into an ice cube tray; pull one cube out whenever you need it
- Sweet peppers — chop and freeze without blanching; perfect for omelets, soups, and sautés
- Tomatoes — freeze whole when you have a garden glut; ideal for sauces even after the texture softens
- Leafy greens — blanch briefly, cool in ice water, squeeze dry, and freeze flat in portions
- Cooked beans — freeze in two-cup portions (equivalent to a can) for fast weeknight meals
- Bread and baked goods — slice before freezing so you can pull out exactly what you need
- Cooked grains — rice, quinoa, and farro all freeze well in portions and reheat in minutes
The Right Container Changes Everything
You do not need to spend a lot of money on storage containers. But you do need containers that seal properly and fit what you are storing without leaving a lot of extra air space. Air is what causes freezer burn and speeds oxidation in the pantry. A well-sealed container in the right size is one of the most practical investments a kitchen can make.
Glass Jars Are Your Best Friend
Mason jars and other wide-mouth glass jars are endlessly useful for food storage. They seal tightly, don’t absorb odors or stains, are easy to see through, and go straight from pantry to refrigerator without any special treatment. I use them for dry goods, leftover beans, homemade sauces, fresh herbs in water, cut vegetables, and overnight oats. A good collection of glass jars is a homestead kitchen staple that pays for itself within the first few months.
One note if you are freezing liquids in glass: leave at least an inch of headspace at the top. Liquids expand when they freeze, and a jar with no room will crack or shatter.
Care Is the Ingredient That Doesn’t Expire
Every labeled freezer bag, every jar sealed before it goes on the shelf, every paper towel tucked in with the greens — these are small acts. They do not take much time. But they are the difference between a kitchen that works for you and one that slowly, quietly drains the resources you have worked hard for.
Storing food with care is homesteading in its most practical form. It is how you honor the garden, the harvest, the labor, and the people you feed. And it is something any one of us can start doing better, today, with what we already have at home.
From my backyard to yours,
AuntC♥